I get a lot of questions about my revamped shoes. I decided to share some tips. It's so easy! Get ready for your complete shoe transformation!
Ankara Shoes (DIY)

There are many ways to do this, but I want to show an awesome and easy way to recycle your old shoes and create a bright and fashionable outfit.
What You Need
- Ankara Fabric
- Fabric glue (actually, any craft adhesive. I usually use ‘Top Bond’ because it is very affordable and always available. Please, on no account should you even think of using super glue!)
- Pair of old shoes (duh!)
- Scissors
- Razor
- Gloves (optional. I get dried glue on my hands. Yuck yuck.)
- Your creativity
- And more patience (this is key!)
Now let's take it step by step (just the way I made these ones with all the mistakes along the way). Pictures will be shown below.
Depending on the type of shoes you're working with, you might (not) need some of the steps listed here.
Step 1
Cut out a piece of fabric for the front of shoe. I folded the edge to make the result neater. As you go along, you’d make your own ‘rules’. Apply enough glue to shoe, carefully stick on fabric. Press onto material of shoe to ensure even distribution of glue and increase contact points.
Step 2
Because of the curve of the shoe, I couldn’t use just one fabric ‘cut’ (at this point I had not thought of just sticking one big fabric on and adjusting to taste. But it came out nicer. I like the layer it created. There are no mistakes in handcraft, every one is a new twist), so I stuck another one diagonally across.
Because of the curve of the shoe, I couldn’t use just one fabric ‘cut’ (at this point I had not thought of just sticking one big fabric on and adjusting to taste. But it came out nicer. I like the layer it created. There are no mistakes in handcraft, every one is a new twist), so I stuck another one diagonally across.
Step 3
Start on the front of the shoe. I did the front and back first because they were the most obvious parts of the shoe and I felt it’d have better finishing if they were done first. (As I said earlier, it depends on the type of shoes. For some you might have to start with the soles. I loved the soles of these, so I didn't bother touching them)
Start on the front of the shoe. I did the front and back first because they were the most obvious parts of the shoe and I felt it’d have better finishing if they were done first. (As I said earlier, it depends on the type of shoes. For some you might have to start with the soles. I loved the soles of these, so I didn't bother touching them)
Step 4
For the body I just cut a big piece and covered both sides at the same time. If the cut and design of the shoes allow it, you could jump this step. It's a personal trick.
For the body I just cut a big piece and covered both sides at the same time. If the cut and design of the shoes allow it, you could jump this step. It's a personal trick.
Step 5
Slit open the middle of the glued fabric. Also cut at the points where the shoes curve. You’ll understand all these as you do yours. Then glue to the insides of the shoes.
Slit open the middle of the glued fabric. Also cut at the points where the shoes curve. You’ll understand all these as you do yours. Then glue to the insides of the shoes.
Step 6
Give yourself a hug. Lol. Really. The shoes are done. It's up to you to finish up with a personal touch. (I decided to add bows to mine)
Tips and warning
- Do both shoes together at a time. What you want is two shoes that look alike. It's a pretty hard thing to do with the latest Ankara prints. But you can!
First you measure and cut the first piece and then cut the second one exactly the same size and the same print direction and pattern. Do not start with one shoe, glue the fabric up and then move to another. You might never be able to match them up like that. First cut both pieces, match them and then move on to gluing.
- While gluing, ensure that you cover EVERY inch of the shoes with fabric. The fissure between the sole and the body especially. Use your nails (blessed are you if you have long nice nails like me *grins*) or any flat object to help get the fabric in properly.
- When cutting off excess fabric, leave a very tiny space to tuck into the fissures of the shoes. It makes your work neater. Instead of cutting off at the very junction, leave a little and tuck in properly.
- Try as much as possible to reduce the amount of glue that seeps through the fabric to avoid staining. In other words, don’t use too much glue . . . don’t use too little either. We don’t want our fabric falling off after 2 weeks, do we?
Styling Tips
BE CREATIVE. Go ahead to make a match for your new shoes. You can:
- Wrap up an old purse.
- Create same Ankara accessories, such as necklace or bangles to rock it pretty. (see more accessories for ideas)
- Cut out part of the fabric to be used as scarf (Click here to see a pictorial tutorial of one way to tie a scarf.)
Actually, most of my What-I-Wore posts would inspire your styling. You know that, right? *winks*
Pictures Of The Making

 |
| the shoes were really old mehn. Lol. |
 |
| the Ankara fabric |
 |
| glue |
 |
| pair of scissors |
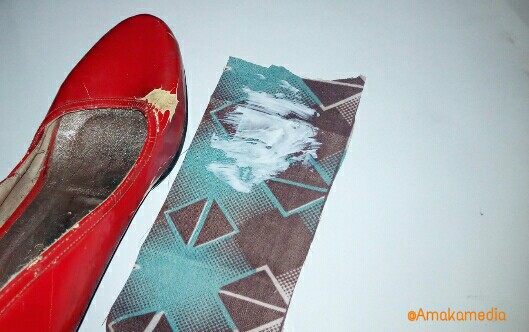 |
| Of course, you know glue has to be applied on the alternate side of the fabric, right? |
 |
| cover every inch of the shoe with fabric (I forgot to iron the fabric. Please don't forget) |
 |
| cut off excess fabric |
 |
| observe the space |
 |
| use your fingers or any flat object to get the fabric in properly |
 |
| oh, don't worry about the glue spilling over. You'll clean up later to give it a perfect finishing |
 |
| job hazards. Lol. If you can't handle this, wear a glove |
 |
| after cutting off excess fabric and getting your fabric in, allow to dry |
 |
| My first warning was born out of this mistake. It wasn't until I finished the first shoe that I realized I had used only the green patterned part of the fabric. (I was so pained because I wanted red to be on it too). So I had to do same on the other one. |
 |
| It's almost like "copy and paste". What you've got on the first one has got to be on the second one. You are done! |
 |
| You can be creative by adding some embellishment |

Now, that's perfect. :)
Remember to have fun in them! Show me when you’re done (with pictures of the making). Best attempt gets a prize! Yeah! A giveaway already. Just send me your pictures via email.
I've worn Ankara shoes HERE, HERE, and THERE. However, I will show you how I rocked these particular ones next week. :)
Stay inspired.
Love you.
Love you.
Posted by Nwamaka Ajaegbu
Let's connect on Twitter: @Amakamedia
Let's connect on Instagram: @amakamedia
Do Email: amakamedia@yahoo.com
And Bloglovin: Amakamedia
Heart Rays . . . giving out the light.